Shortly thereafter a big pile of Amy Butler fabrics and coordinating solids showed up at my door.
The quilt wasn't made to my design so I didn't have to come up with and consequently draw up the instructions for a pattern. I just had to follow a pattern. Not used to that! Needless to say I made a few silly mistakes along the way. The joy of making to your own pattern is (a) you tend to know what your next step is in advance, and (b) you can pretend it was what you meant to do all along if you 'do things differently'.
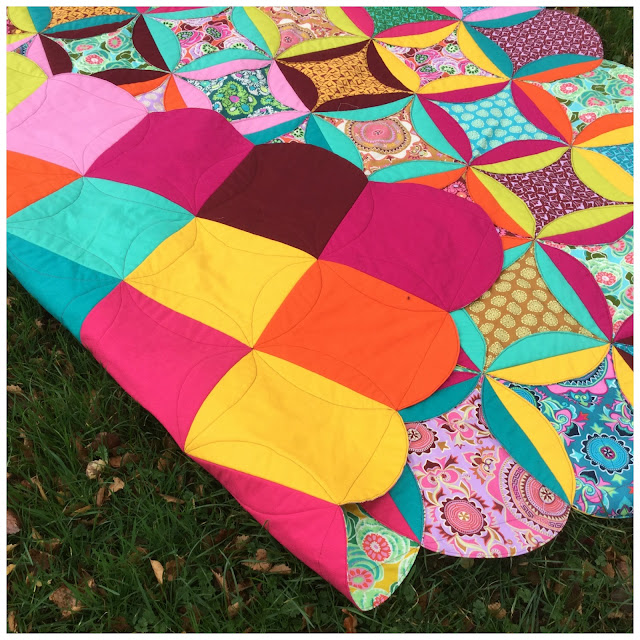
Here is the quilt that I made.
The pattern is really different and the only thing that made me think I wasn't going to be able to achieve the rushed delivery was the fact that I needed to cut out 128 fabric circles and 64 wadding circles. That's a lot of circle cutting! Thankfully my man came to the rescue. Never underestimate the power of a technical type of guy with lots of boy toys in the garage. One sheet of 1/4" thick template plastic and a band saw later and he had cut me two circles in the desired sizes.
Let's just say he's my hero. There was no way I could have done this quilt quickly without a total loss of sanity without the ease of using these templates and a rotary blade at speed.
The quilt is made by making 64 sandwiches of print, wadding and solid - which are turned the right way out. (Too difficult to explain without photos so really if you like the pattern the best bit is to get the issue of the magazine.)
The circles are sewn together and the overlapping curved bits sewn down when you quilt it. I know it sounds weird and complicated but it isn't. The cutting is the worst bit. The quilt goes together really quickly, honestly. Way quicker than I could ever have imagined.
And you get these really cool contrasts of prints and vivid solids, front and back.
I would make this pattern again. Especially as I have the templates ready made now.
Susan


Hi Susan! If you made this quilt in few days you have to have the magic wand! Quilt looks amazing and I can't figure out how it's made, so surely you have done magic! x Teje
ReplyDeleteI have it figured out....just wondering where the opening is to turn inside out and how you finished the opening?:)
ReplyDeleteI love this quilt!
ReplyDeleteP.S. Maybe J/you should consider selling the templates? They look really handy! Did you use a small rotary cutter or just your usual one?
I really like the look of this, especially if it is quick. x
ReplyDeleteAbsolutely LOVE this quilt! Saw it in the mag and totally want to make one! Would happily purchase some templates off you?! xx
ReplyDeleteHe's for keeps that man of yours! The magazine should have paid him to mass produce them and send them out with the pattern!
ReplyDeleteAdd me to the list of interested in templates.... gorgeous quilt!
ReplyDeleteYou will have to show me how to do this when I'm over. I just got a circle rotary cutter for my birthday.
ReplyDeleteGreat rescue!!
ReplyDeleteAnd I love your quilt; it reminds me of a pattern by Amy Gibson at Moda bakeshop years ago.
It's a stunner!
ReplyDeleteit's lovely. I've seen this technique before, but I'm wondering about the edge because it only has the three layers, where every seam has six. Does the edge feel floppy? Could one square it off by folding the circles back all around the quilt?
ReplyDeleteI like the idea behind the making of this quilt. You did a beautiful and fast job if it.
ReplyDeleteThis quilt is just so cool! You've done an amazing job. I've seen this technique before, with denim jeans and florals for the middle, it looks actually very simple to do, but SO effective! Great job :-)
ReplyDeleteAdd my name to the list for templates! Such a cool idea! I think I have to go shopping for the magazine!
ReplyDeleteBeautiful quilt, Susan! And done in such a short time. You're my hero!
ReplyDeleteThat looks great and complicated but fun! Really like that fabric bundle too, really appealing colours when its pouring down with rain outstide!
ReplyDeleteOK, you are amazing! Just whipped this up...YIKES! Gorgeous!
ReplyDelete